Manual modeling
Kylin follows multidimensional modeling theory when building star or snowflake models based on your tables. Kylin also leverages pre-computation technique and will reuse the pre-computed results to answer queries, so there is no need to traverse all data when there is a query, and thus achieve sub-second query times on PB-level data.
Operation steps
Kylin model consists of multiple tables and their join relations. In this article, we use this SSB dataset, a dataset based on real business applications, and hope to analyze products and supplier information from dimensions such as year, city, supplier name and brand. To achieve this goal, we will create a model in Kylin, and then set dimensions and measures for multidimensional analysis. See the table below for detailed steps.
| Step | Description |
|---|---|
| Step 1: Create a model and add a fact table and dimension tables | In this step, we design the model, and then define the fact table and dimension tables to be analyzed, which will serve as data sources for later data analysis. |
| Step 2: Create join relations among tables | Create join relations between the foreign keys of the fact table and the primary keys of the dimension tables to achieve join queries of the two tables. |
| Step 3: Add dimensions and measures to the model | Set the dimensions and measures for data analysis. Kylin will run pre-computation based on the combination of the defined dimensions and measures, which will greatly accelerate data query. |
| Step 4: Save the model and set the loading method | Save the model settings and specify the data loading method for the pre-computations step. If incremental load is selected, data within a specified time range will be loaded to improve loading efficiency. |
Step 1: Create a model and add a fact table and dimension tables
Log in to Kylin as any of the following roles:
- System admin
- Management or Admin of the target project
To create a model:
In the left navigation panel, click Data Asset > Model.
Click + Model.
In the pop-up dialog box, enter a name and description for the model, and then click Submit.
Model name can be any combination of numbers, letters, and underscores (_).
You will be directed to the model editing page. On this page, add the fact table to the model.
Fact table is used to store fact records, that is, to store data about a business process at the finest granularity, for example, product sales table. It often serves as the primary table of a model.
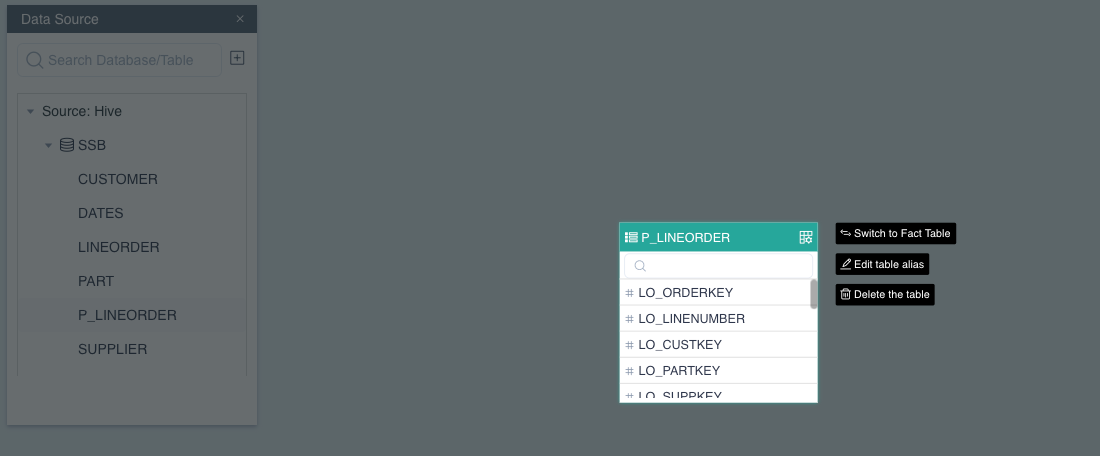
In the left-hand Data Source section, find the target fact table (P_LINEORDER in this example).
[!NOTE]
If there is no table in the Data Source section, please load data source first.
Drag the target table to the right-hand canvas and select Switch to Fact Table.
Add dimension tables to the model.
Dimension table, also called lookup table, is used to store repeated attributes of the fact table, such as date and geographic location. Dimension tables can help to reduce the fact table size and improve dimension management efficiency.
In the left-hand Data Source section, find the target dimension table.
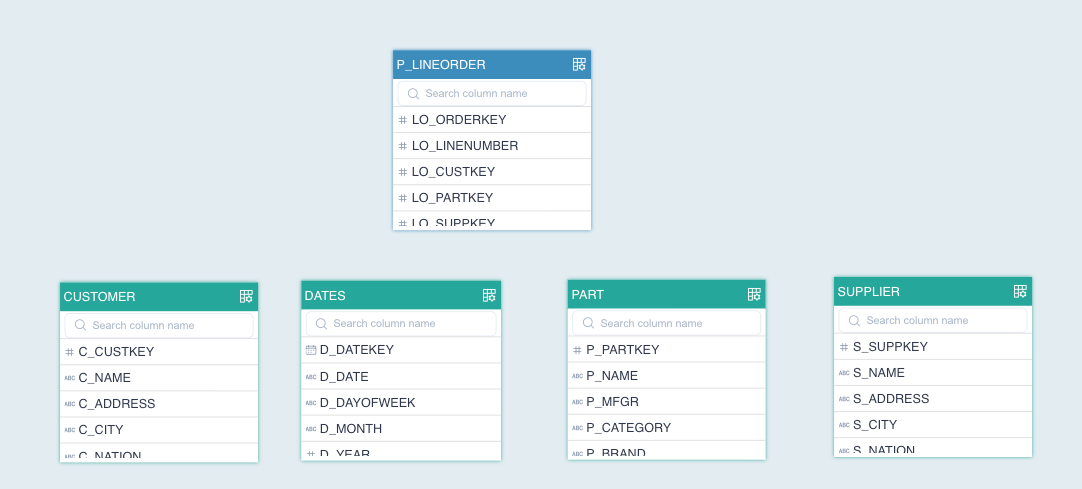
Drag the target table to the right-hand canvas.
To add multiple dimension tables, repeat this step for each table. As shown below, one fact table and 4 dimension tables are added.
Step 2: Create join relations among tables
On the model editing page, drag a column to create a join relation between the foreign key of the fact table and the primary key of the dimension table.

In the Add Join Relationship dialog box, follow the instructions below to set the join relation.
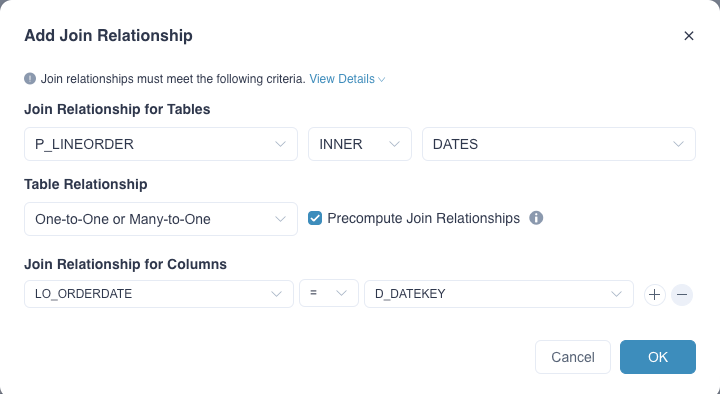
Join Relationship for Tables: It includes 3 drop-down lists. The first and the third one specify the tables to be joined, and the second one defines the join relation. Kylin currently supports LEFT (left join) and INNER (inner join).
Table Relationship: Select the mapping between the foreign and primary keys: One-to-One or Many-to-One, or One-to-Many or Many-to-Many.
Precompute Join Relationship: Select whether to expand the joined tables into a flat table based on the mappings. This option is selected by default. For more information about this function and its applicable scenarios, see Precompute the join relations.
Join Relationship for Columns: It includes 3 drop-down lists. The first and the third one specify the columns to be joined, and the second one defines the join relation, which is equal-join (=) by default. Join relations should meet the following requirements:
- Do not define more than one join relation for the same column; two tables could only be joined by the same condition for one time
- Join relations for columns should include at least one equal-join condition (=)
- Join relations ≥ and < must be used in pairs, and the column in between must be the same. Example: B ≥ A, C < A
Click OK.
To create join relations for multiple tables, repeat steps 1-3 for each table. In this example, we create 4 join relations for tables, which constitute a star model.
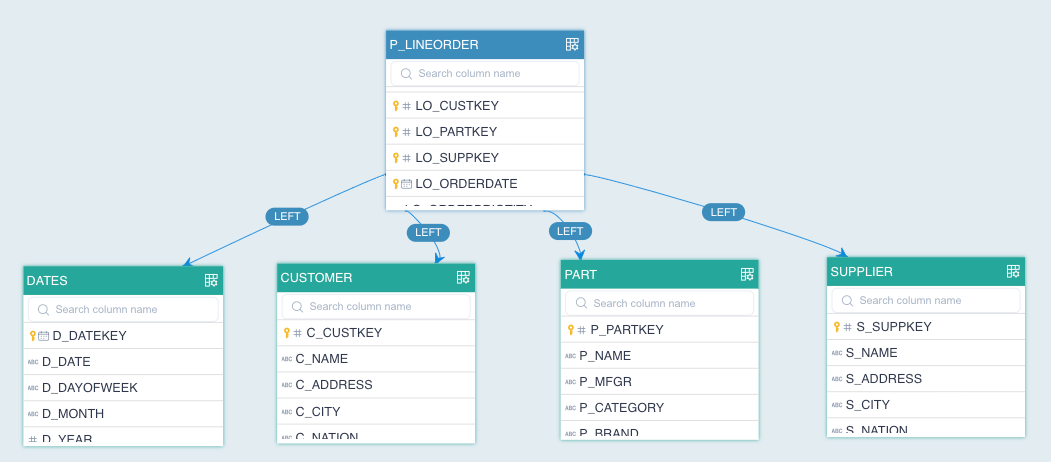
Corresponding SQL statements:
P_LINEORDER LEFT JOIN DATES ON P_LINEORDER.LO_ORDERDATE = DATES.D_DATEKEY
P_LINEORDER LEFT JOIN CUSTOMER ON P_LINEORDER.LO_CUSTKEY = CUSTOMER.C_CUSTKEY
P_LINEORDER LEFT JOIN SUPPLIER ON P_LINEORDER.LO_SUPPKEY = SUPPLIER.S_SUPPKEY
P_LINEORDER LEFT JOIN PART ON P_LINEORDER.LO_PARTKEY = PART.P_PARTKEY
Step 3: Add dimensions and measures to the model
To add dimension tables to the model:
On the model editing page, drag dimension columns from dimension tables to the Dimension section.
To add dimensions in batch, click + in the Dimension section.
In the pop-up dialog box, set the dimension name.
By default, it's the column name. It can be any combination of letters, numbers, spaces, and special characters
(_ -()%?).Click OK.
In our example, we added year (D_YEAR in DATE), the city customer is in (CITY in CUSTOMER), supplier name (S_NAME in SUPPLIER), and brand (P_BRAND in PART) as dimensions.
Add measures to the model.
On the model editing page, drag dimension columns from dimension tables to the Measure section.
To add dimensions in batch, click + in the Measure section.
In the Add Measure dialog box, follow the instructions below to complete join relation settings.
Name: Column name by default. It can be any combination of letters, numbers, spaces, and special characters
(_ -()%?).Function: SUM (column) by default. Kylin has a variety of built-in basic and advanced functions, such as Count Distinct, TopN, etc. For more information, see Advanced measures.
Column: The measure column. No adjustment is needed.
Note (Optional): Enter notes to facilitate future measure management.
Click Submit.
In our example, we added revenue (LO_REVENUE in P_LINEORDER) and supply cost (LO_SUPPLYCOST in P_LINEORDER) as measures, and wanted to calculate the sum for each.
(Optional) To achieve complex processing and computation based on the existing columns, you can add computed columns to the model. For more information, see Computed columns.
Step 4: Save the model and set the loading method
In the bottom right corner of the model editing page, click Save.
In the Save dialog box, follow the instructions below to complete model settings.
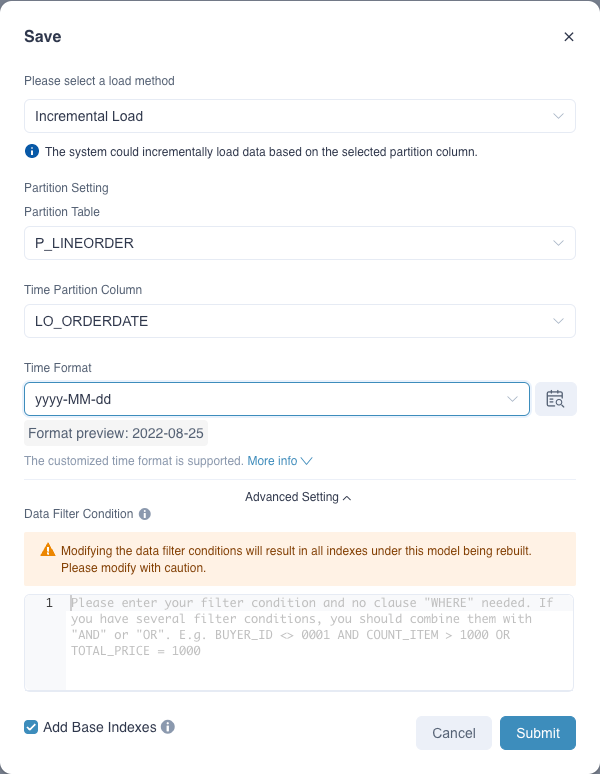
- Please select a load method:
- Full Load: Load and pre-compute all data in the source table according to different combinations of dimensions and measures.
- Incremental Load: Load and pre-compute data within the specified time range in the source table according to combinations of dimensions and measures. You also need to specify the following parameters if this option selected.
- Partition Table: Fact table (default and cannot be changed)
- Time Partition Column: Select a column of the time type in the partition table.
- Time Format: Select the time format. Or you can click
 and Kyligece will automatically fill in the time format.
- Advanced Setting: Use the data filter to filter out null values or data meeting certain requirements. Use
ANDorORto associate multiple filters, for example,BUYER_ID <> 0001 AND COUNT_ITEM > 1000 OR TOTAL_PRICE = 1000. - Add Base Indexes: Add the following base indexes. This option is enabled by default so base indexes will automatically update when model dimensions and measures change.
- Base aggregate index: It includes all model dimensions and measures.
- Base table index: It includes all columns of model dimensions and measures.
- Please select a load method:
Click Submit.
After the model is saved, you can click View Index in the Notice dialog box to check the aggregate index and table index that Kylin automatically creates.
Next steps
For the newly created base indexes, you need to build them so Kylin can run pre-computation based on these indexes to accelerate queries.
[!NOTE]
There are few scenarios where base indexes can be used to accelerate queries. To improve query efficiency, you need to add more indexes to the model. For more information, see Aggregate index and Table index.
FAQ
Question: Why did I get an error when saving the time partition column settings?
Answer: This error occurs when the time format of the time partition column does not match the target format. Kylin supports the following time formats:
yyyyMMdd,yyyy-MM-dd,yyyy/MM/dd,yyyy-MM-dd HH:mm:ss,yyyy-MM-dd HH:mm:ss.SSS,yyyy-MM,yyyyMMandyyyy-MM-dd'T'HH:mm:ss.SSS'Z'.Kylin also supports customized time formats if the following conditions are met:
- Any combination of yyyy, MM, dd, HH, mm, ss, and SSS is used with the elements in ascending order.
- Hyphens (-), forward slashes (/), columns (:), or spaces are used as separators.
- Unformatted letters are enclosed in single quotation marks ('). For example, 'T' is recognized as T.
[!NOTE]
When the time format is customized as
yyyyMMddHHmmss, the corresponding column in the Hive table should be strings, or Kylin may fail to recognize column data.Question: I've modified several tables from the same model. Why did I get an error when reloading these tables?
Answer: Since Kylin currently only supports loading a single table at a time, please edit and reload tables one by one, rather than reload several modified tables at a time.
Question: I've modified several tables from the same model. Why did I get an error when reloading these tables?
Answer: Since Kylin currently only supports loading a single table at a time, please edit and reload tables one by one, rather than reload several modified tables at a time.
Question: What are the rules for the model to go online?
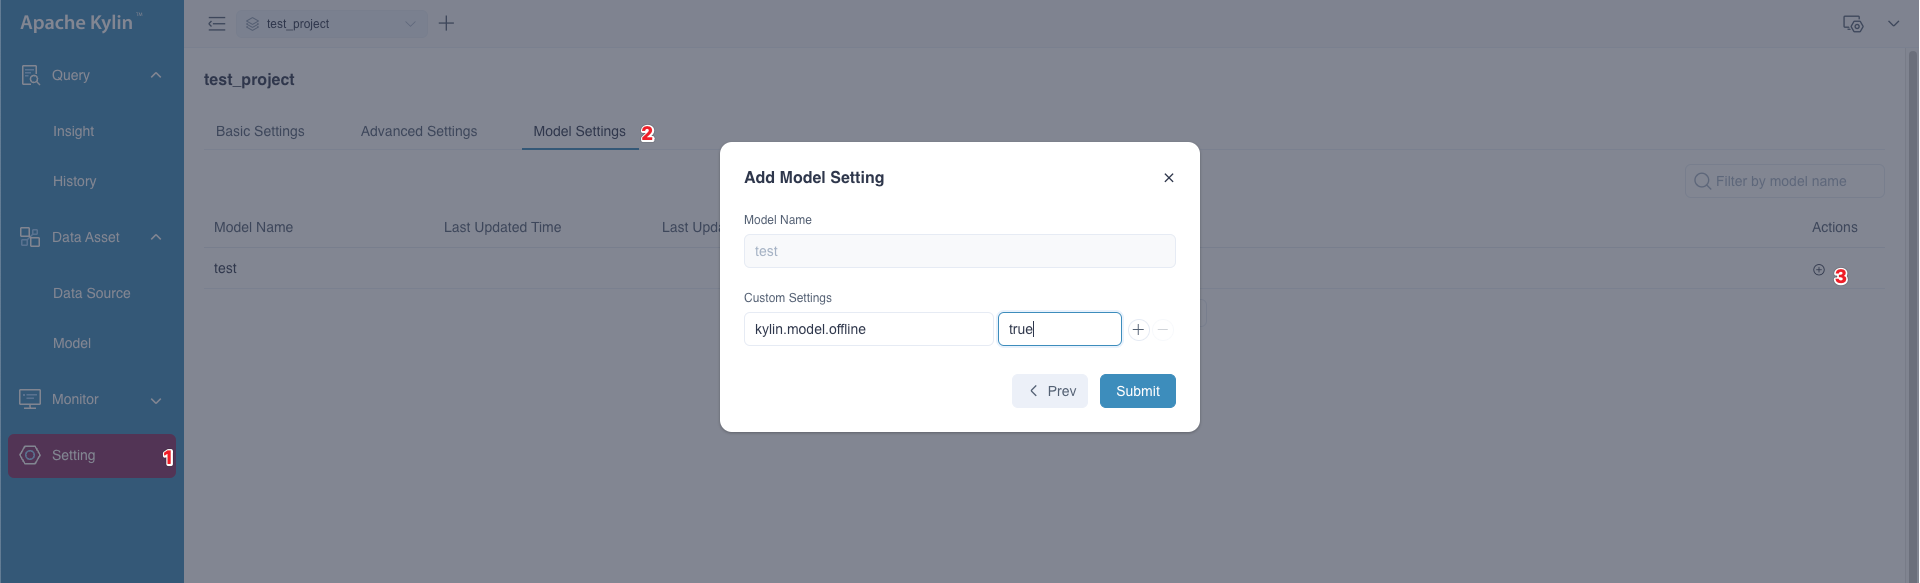
Answer: It will automatically switch to online when the building job completed. However, customer may need to continually build some historical data during a period when creating a new report or testing, and may not want this model to serve any query unless it has built all data. In this case, we also offer a model level configuration to ensure users can control the model status manually . After configuring the
kylin.model.offlinetotrue(default value is false) in model rewriting page, the model will not switch to online status even if the building job completed. Therefore, user will not worry about the model disturb the query route.